
2023. 7. 8. 14:41ㆍ앱 개발
"포모도로(Pomodoro)"
포모도로는 프란체스코 시릴로(Francesco Cirillo)가 사용한 토마토 모양 타이머에서 따온 시간 관리 기법의 이름이자
각 시간 간격을 의미하는 용어입니다.

Cirillo가 제안한 기법에서는 시간 간격을
25분으로 설정합니다.
즉, 25분간의 포모도로 동안 일에 집중하고,
그런 다음 짧은 휴식을 갖는 방식이죠.
이러한 포모도로 기법에 기반하여
타이머 앱을 개발해 보았습니다.
- 개발 관련 상세 정보-
개발 소요 기간: 1일
개발 프레임워크: Flutter(플러터)
텍스트 에디터: Visual Studio Code
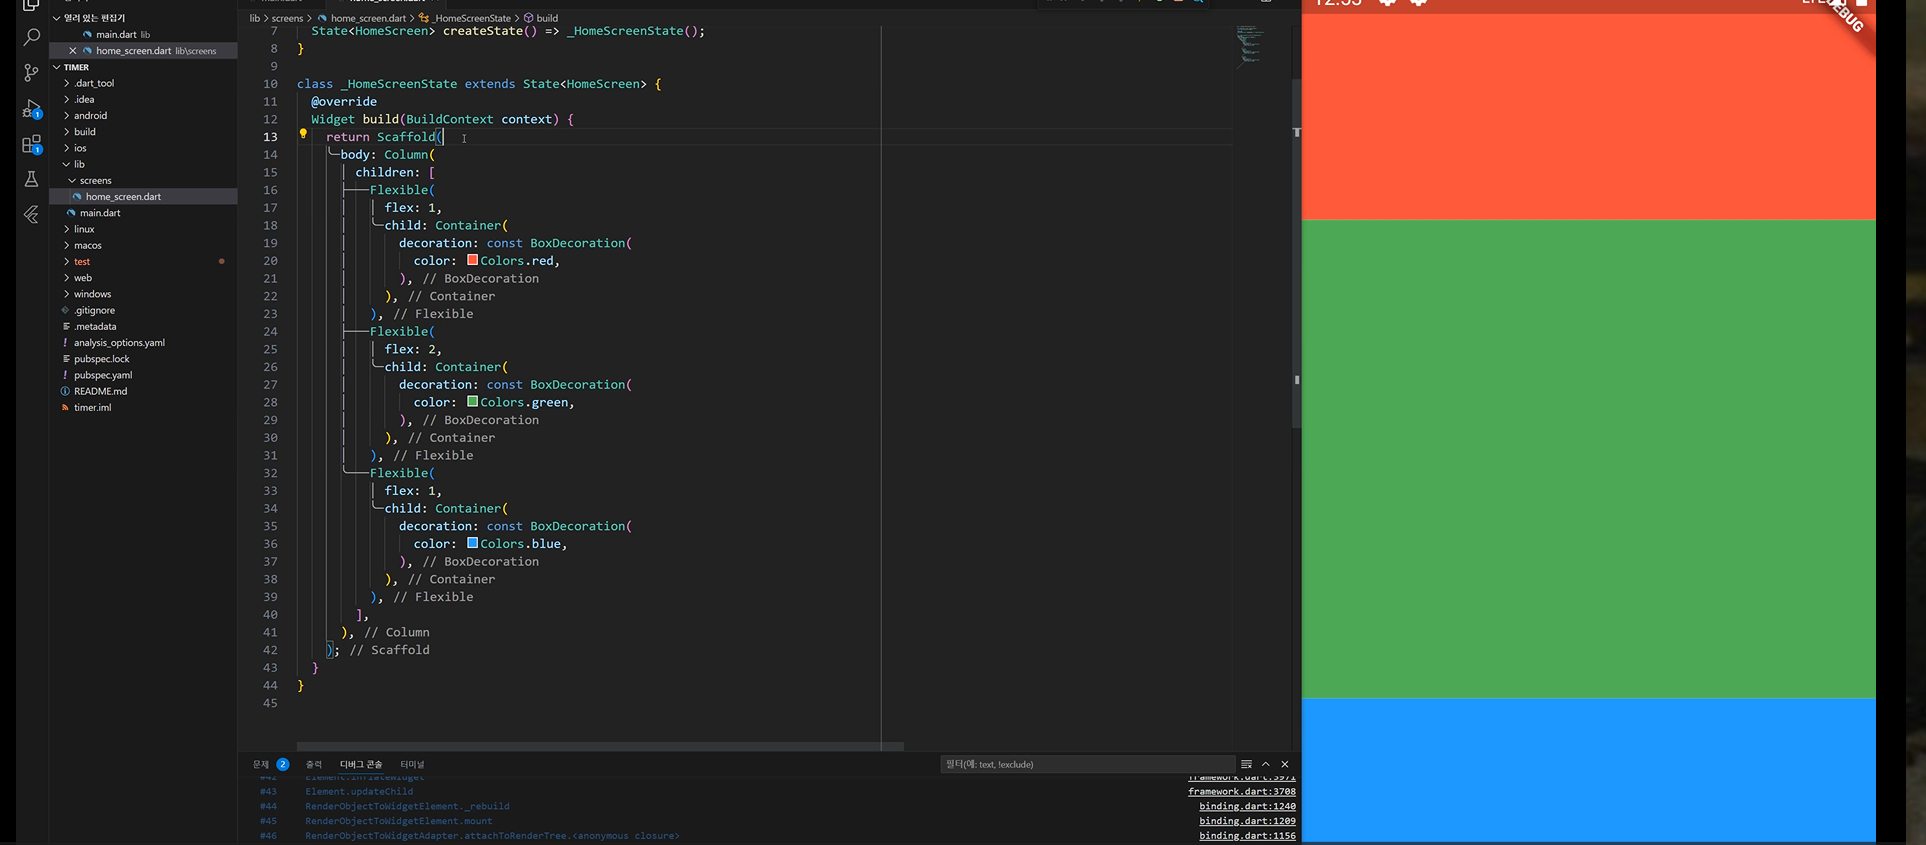
"Flexible Widget"
Flexible 위젯은 Flutter에서 사용되는 레이아웃 위젯 중 하나로, 유연한 공간 분배를 제공합니다.
주로 Row나 Column과 같은 Flex 컨테이너 내에서 자식 위젯을 유연하게 배치하거나 크기를 조정할 수 있습니다.
Row(
  children: [
    Flexible(
      flex: 1,
      child: Container(
        color: Colors.red,
        height: 50,
      ),
    ),
    Flexible(
      flex: 2,
      child: Container(
        color: Colors.blue,
        height: 50,
      ),
    ),
    Flexible(
      flex: 3,
      child: Container(
        color: Colors.green,
        height: 50,
      ),
    ),
  ],
)
위의 예시에서는 Row 위젯 안에 Flexible 위젯이 세 개 사용되었습니다.
첫 번째 Flexible 위젯은 flex: 1, 두 번째는 flex: 2, 세 번째는 flex: 3으로 설정하고,
이에 따라 자식 위젯인 Container의 너비가 비율에 맞게 조정되어 표시됩니다.
예를 들어, 두 번째 Container는 첫 번째 Container보다 두 배의 너비를 갖게 됩니다.

4개의 Flexible 위젯으로 나눠주고 각각의 위젯에 텍스트 및 버튼을 넣어줬습니다.
첫 번째 Flexible 위젯: Text("25:00")
두 번째 Flexible 위젯: Text("flex2")
세 번째 Flexible 위젯: FontAwesomeIcons.circle.Pause
네 번째 Flexible 위젯: Text("ROUND"), Text("GOAL")
<첫 번째 Flexible 위젯>
String format(int seconds) {
    var duration = Duration(seconds: seconds);
    return duration.toString().split('.').first.substring(2, 7);
  }
텍스트 형식으로만 입력되어 있는 시간 표시를
실제 시간으로 바꿔주어야 합니다.
해당 코드는 format 함수로, 정수형 seconds 값을 받아서 시간 형식으로 포맷팅하여 문자열로 반환합니다.
다음은 코드의 분석입니다.
var duration = Duration(seconds: seconds);: 주어진 seconds 값을 기반으로 Duration 객체를 생성합니다.
Duration 클래스는 시간 간격을 나타내는 클래스로, 초, 분, 시간, 일 등의 단위로 시간을 표현할 수 있습니다.
return duration.toString().split('.').first.substring(2, 7);: duration 객체를 문자열로 변환한 후,
소수점 이하 부분을 제거하기 위해 split('.') 메서드를 사용하여 문자열을 분할합니다.
여기서 .을 기준으로 문자열을 분리하며, first를 통해 분리된 첫 번째 요소를 선택합니다.
그 후, substring(2, 7)을 사용하여 문자열의 일부를 추출합니다. 이를 통해 00:00 형식의 시간 문자열이 반환됩니다.
<두 번째 Flexible 위젯>
import 'package:flutter/material.dart';

class BuildSelectableButton extends StatefulWidget {
  const BuildSelectableButton({
    Key? key,
    required this.onSelectionChanged,
    required this.text,
  }) : super(key: key);

  final ValueChanged<bool> onSelectionChanged;
  final String text;

  @override
  State<BuildSelectableButton> createState() => _BuildSelectableButtonState();
}

class _BuildSelectableButtonState extends State<BuildSelectableButton> {
  bool _isSelected = false;

  void _onTap() {
    setState(() {
      _isSelected = !_isSelected;
    });

    widget.onSelectionChanged(_isSelected);
  }

  @override
  Widget build(BuildContext context) {
    return GestureDetector(
      onTap: _onTap,
      child: Padding(
        padding: const EdgeInsets.all(5.0),
        child: Container(
          decoration: BoxDecoration(
            color: _isSelected
                ? Theme.of(context).colorScheme.primary
                : Theme.of(context).colorScheme.primary.withOpacity(0.3),
            borderRadius: BorderRadius.circular(15),
            border: Border.all(
              color: _isSelected
                  ? const Color(0xFFF4EDDB)
                  : const Color(0xFFF4EDDB).withOpacity(0.3),
              width: 2.5,
            ),
          ),
          width: 90,
          height: 10,
          child: Center(
            child: Text(
              widget.text,
              style: TextStyle(
                color: _isSelected
                    ? Theme.of(context).cardColor
                    : Theme.of(context).cardColor.withOpacity(0.3),
                fontSize: 30,
                fontWeight: FontWeight.bold,
              ),
            ),
          ),
        ),
      ),
    );
  }
}
▲ home_screen.dart 버튼 위젯 추출
Flexible(
            flex: 1,
            child: ListView(
              scrollDirection: Axis.horizontal,
              children: [
                for (String time in timeValues)
                  BuildSelectableButton(
                    onSelectionChanged: (isSelected) =>
                        handleSelectionChanged(time, isSelected),
                    text: time,
                  ),
              ],
            ),
          ),
▲ 두 번째 Flexible 소스코드
Set<String> selectedInterests = {};

  void handleSelectionChanged(String interest, bool isSelected) {
    setState(() {
      if (isSelected) {
        selectedInterests.add(interest);

        if (interest == '15') {
          totalSeconds = fifteenMinutes;
          resetSeconds = fifteenMinutes;
        } else if (interest == '20') {
          totalSeconds = twentyMinutes;
          resetSeconds = twentyMinutes;
        } else if (interest == '25') {
          totalSeconds = twentyFiveMinutes;
          resetSeconds = twentyFiveMinutes;
        } else if (interest == '30') {
          totalSeconds = thirtyMinutes;
          resetSeconds = thirtyMinutes;
        } else if (interest == '35') {
          totalSeconds = thirtyFiveMinutes;
          resetSeconds = thirtyFiveMinutes;
        } else if (interest == '40') {
          totalSeconds = fortyMinutes;
          resetSeconds = fortyMinutes;
        } else if (interest == '45') {
          totalSeconds = fortyFiveMinutes;
          resetSeconds = fortyFiveMinutes;
        } else if (interest == '50') {
          totalSeconds = fiftyMinutes;
          resetSeconds = fiftyMinutes;
        } else if (interest == '55') {
          totalSeconds = fiftyfiveMinutes;
          resetSeconds = fiftyfiveMinutes;
        }
      } else {
        selectedInterests.remove(interest);

        totalSeconds = 0;
        resetSeconds = 0;
      }
    });
  }

  List<String> timeValues = [
    '15',
    '20',
    '25',
    '30',
    '35',
    '40',
    '45',
    '50',
    '55',
  ];
▲ handleSelectedChanged 함수 선언 및 분 리스트
기존의 포모도로 기법으로는 25분 간격의 타이머였다면,
이번 앱은 타이머의 간격을 직접 설정할 수 있게
15분부터 5분 간격으로 55분까지를 리스트에 넣었습니다.
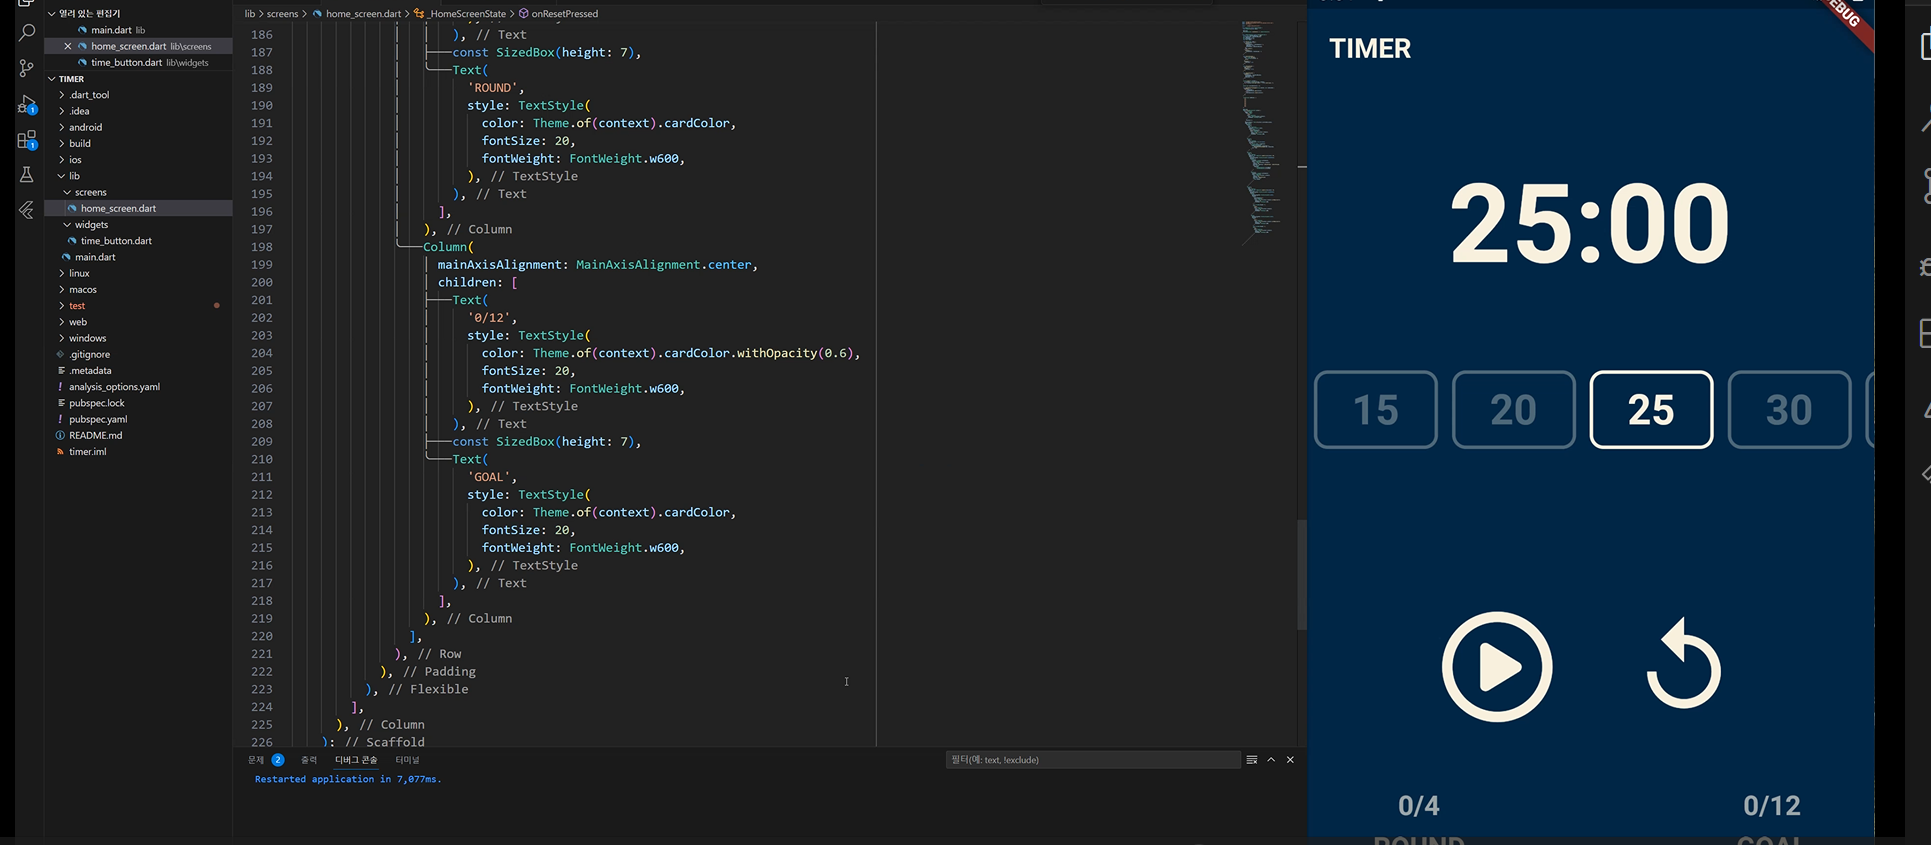
<세 번째 Flexible 위젯>
세 번째 Flexible 위젯에는 보시다시피 타이머 시작, 멈춤 버튼과 리셋 버튼이 구현되어 있습니다.
버튼 아이콘은 FontAwesome 패키지를 설치하여 사용했습니다.
Flexible(
            flex: 3,
            child: Padding(
              padding: const EdgeInsets.symmetric(horizontal: 90),
              child: Row(
                mainAxisAlignment: MainAxisAlignment.spaceBetween,
                children: [
                  Container(
                    alignment: Alignment.bottomCenter,
                    child: IconButton(
                      color: Theme.of(context).cardColor,
                      iconSize: 80,
                      onPressed: isRunning ? onPausePresed : onStartPressed,
                      icon: FaIcon(
                        isRunning
                            ? FontAwesomeIcons.circlePause
                            : FontAwesomeIcons.circlePlay,
                      ),
                    ),
                  ),
                  Container(
                    alignment: Alignment.bottomCenter,
                    child: IconButton(
                      color: Theme.of(context).cardColor,
                      iconSize: 80,
                      onPressed: onResetPressed,
                      icon: const Icon(
                        Icons.replay,
                      ),
                    ),
                  ),
                ],
              ),
            ),
          ),
FontAwesome 패키지는 아이콘 기반의 디자인 시스템을 제공하는 오픈 소스 아이콘 라이브러리입니다.
이 패키지를 사용하면 다양한 종류의 아이콘을 쉽게 사용할 수 있습니다.
Flutter에서 사용하기 위해서 Dart packages (pub.dev)에서 패키지를 검색하시면 됩니다.

<네 번째 Flexible 위젯>
네 번째 위젯에서는 타이머의 시간이 지정한 시간 간격만큼 흐른 후 횟수를 세어주는 기능을 구현했습니다.
Flexible(
            flex: 2,
            child: Padding(
              padding: const EdgeInsets.symmetric(horizontal: 48),
              child: Column(
                mainAxisAlignment: MainAxisAlignment.center,
                children: [
                  Text(
                    '$totalPomodoros',
                    style: TextStyle(
                      color: Theme.of(context).cardColor.withOpacity(0.6),
                      fontSize: 20,
                      fontWeight: FontWeight.w600,
                    ),
                  ),
                  const SizedBox(height: 7),
                  Text(
                    'TIMER COUNT',
                    style: TextStyle(
                      color: Theme.of(context).cardColor,
                      fontSize: 20,
                      fontWeight: FontWeight.w600,
                    ),
                  ),
                ],
              ),
            ),
          ),
int totalSeconds = 0;
int resetSeconds = 0;
bool isRunning = false;
int totalPomodoros = 0;
late Timer timer;
void onTick(Timer timer) {
if (totalSeconds == 0) {
setState(() {
totalPomodoros = totalPomodoros + 1;
isRunning = false;
totalSeconds = twentyFiveMinutes;
});
timer.cancel();
} else {
setState(() {
totalSeconds = totalSeconds - 1;
});
}
}onTick 함수에서 totalSeconds가 0이 되는 경우
totalPomodoros에 1을 더해주는 조건문으로 구현했습니다.
다음에는 더 유익한 개발로 돌아오겠습니다.
감사합니다.